实名认证和防沉迷开发指南
集成前准备
- 参考 开发者中心配置 创建应用、配置包名与签名证书
- 参考 合规认证功能介绍中准备工作开通防沉迷服务
- 参考集成指南(Unity、Android、iOS)完成对应平台或引擎的基础接入
- 合规认证模块依赖于 TapTap 登录模块,开发者接入前应先完成 TapTap 登录的接入
权限说明
- Android
该模块需要如下权限:
| 权限 | 使用目的 | 权限申请时机 |
|---|---|---|
| 网络权限 | 用于正常网络请求 | 用户首次使用该功能时会申请权限 |
| 获取网络状态权限 | 用于检测当前网络连接是否有效 | 用户首次使用该功能时会申请权限 |
该模块将在应用中添加如下权限:
<uses-permission android:name="android.permission.INTERNET"/>
<uses-permission android:name="android.permission.ACCESS_NETWORK_STATE" />
SDK 获取
- Unity
- Android
- iOS
远程依赖
NPMJS 方式:在 Packages/manifest.json 中添加:
"dependencies":{
  "com.taptap.sdk.core":"4.10.4",
  "com.taptap.sdk.login":"4.10.4",
  "com.taptap.sdk.compliance":"4.10.4"
}
GitHub 方式:在 Packages/manifest.json 中添加:
"dependencies":{
  "com.taptap.sdk.core":"https://github.com/taptap/tapsdk-unity-dist.git?path=/Core#4.10.4",
  "com.taptap.sdk.login":"https://github.com/taptap/tapsdk-unity-dist.git?path=/Login#4.10.4",
  "com.taptap.sdk.compliance":"https://github.com/taptap/tapsdk-unity-dist.git?path=/Compliance#4.10.4"
}
本地文件导入
在 下载页 下载并导入以下 unitypackage 文件:
TapSDK_Core.unitypackage(TapTapSDK 核心模块,必选)TapSDK_Login.unitypackage(TapTapSDK 登录模块,必选)TapSDK_Compliance.unitypackage(TapTapSDK 合规认证模块,必选)
在 app module 的 build.gradle 中添加对应依赖:
dependencies {
  implementation 'com.taptap.sdk:tap-core:4.10.4'
  implementation 'com.taptap.sdk:tap-login:4.10.4'
  implementation 'com.taptap.sdk:tap-compliance:4.10.4'
}
远程依赖
- 在工程 Podfile 文件中对应模块下添加依赖:
pod 'TapTapSDK/Compliance', '~> 4.10.4'
- 执行
Pod install下载对应依赖文件
本地文件依赖
合规认证依赖于初始化和 TapTap 登录模块,使用本地文件方式添加依赖时,需先参考集成指南 和 TapTap 登录添加对应本地文件依赖项。
- 在下载页下载如下文件:
TapTapComplianceSDK.xcframework合规认证依赖库TapTapComplianceResource.bundle合规认证资源文件
- 在工程中添加
framework静态库,注意添加时选择 Embed 方式为 Do Not Embed,导入bundle资源文件
初始化额外配置
合规认证模块在初始化时支持设置是否显示切换账号和使用年龄段信息,示例如下:
- Unity
- Android Java
- Android Kotlin
- iOS Swift
- iOS Objective-C
using TapSDK.Core;
using TapSDK.Compliance;

// 核心配置
TapTapSdkOptions coreOptions = new TapTapSdkOptions
{
   // 客户端 ID,开发者后台获取
   clientId = clientId,
   // 客户端令牌,开发者后台获取
   clientToken = clientToken
};

// 合规认证配置
TapTapComplianceOption complianceOption = new TapTapComplianceOption
{
    showSwitchAccount = true,  // 是否显示切换账号按钮
    useAgeRange = false  // 游戏是否需要获取真实年龄段信息
};
// 其他模块配置项
TapTapSdkBaseOptions[] otherOptions = new TapTapSdkBaseOptions[]
{
    complianceOption
};
// TapSDK 初始化
TapTapSDK.Init(coreOptions, otherOptions);
import com.taptap.sdk.compliance.option.TapTapComplianceOptions;
import com.taptap.sdk.core.TapTapSdk;
import com.taptap.sdk.core.TapTapSdkOptions;

TapTapSdkOptions tapSdkOptions = new TapTapSdkOptions(
        "clientId", // 游戏 Client ID
        "clientToken", // 游戏 Client Token
        TapTapRegion.CN // 游戏可玩区域: [TapTapRegion.CN]=国内 [TapTapRegion.GLOBAL]=海外
);

// 可选配置 合规模块
TapTapComplianceOptions tapComplianceOptions = new TapTapComplianceOptions(
        true, // 是否显示切换账号按钮
        false // 游戏是否需要获取真实年龄段信息
);
// 初始化 TapSDK
TapTapSdk.init(context, tapSdkOptions, tapComplianceOptions);
import com.taptap.sdk.core.TapTapSdk
import com.taptap.sdk.core.TapTapSdkOptions
import com.taptap.sdk.compliance.option.TapTapComplianceOptions

TapTapSdk.init(
    context = context,
    sdkOptions = TapTapSdkOptions(
        clientId = "clientId", // 游戏 Client ID
        clientToken = "clientToken", // 游戏 Client Token
        region = TapTapRegion.CN // 游戏可玩区域: [TapTapRegion.CN]=国内 [TapTapRegion.GLOBAL]=海外
    ),
    options = arrayOf(
        TapTapComplianceOptions(
            showSwitchAccount = true, // 是否显示切换账号按钮
            useAgeRange = false, // 游戏是否需要获取真实年龄段信息
        )
    )
)
import TapTapComplianceSDK
import TapTapCoreSDK

// 核心配置
let coreOptions = TapTapSdkOptions()
coreOptions.clientId = "your_client_id" // 必须,开发者中心对应 Client ID
coreOptions.clientToken = "your_client_token" // 必须,开发者中心对应 Client Token

// 合规认证配置
let complianceOptions = TapTapComplianceOptions()

complianceOptions.showSwitchAccount = true // 是否显示切换账号按钮
complianceOptions.useAgeRange = false // 游戏是否需要获取真实年龄段信息


// 其他模块配置项
let otherOptions = [complianceOptions]
// TapSDK 初始化
TapTapSDK.initWith(coreOptions, otherOptions: otherOptions)
#import <TapTapCoreSDK/TapTapSDK.h>
#import <TapTapComplianceSDK/TapTapComplianceOptions.h>

TapTapSdkOptions *coreOptions = [[TapTapSdkOptions alloc] init];
coreOptions.clientId = @"your_clientId"; // 必须,开发者中心对应 Client ID
coreOptions.clientToken = @"your_client_token"; // 必须,开发者中心对应 Client Token

/// 合规认证配置
TapTapComplianceOptions *complianceOptions = [[TapTapComplianceOptions alloc] init];

complianceOptions.showSwitchAccount = YES; // 是否显示切换账号按钮
complianceOptions.useAgeRange = NO; // 游戏是否需要获取真实年龄段信息

// 其他模块配置项
NSArray *otherOptions = @[complianceOptions];
// TapSDK 初始化
[TapTapSDK initWithOptions:coreOptions otherOptions:otherOptions];
TapTapComplianceOptions 参数说明:
showSwitchAccount是否显示切换账号按钮,默认为 false 。如果游戏支持切换账号功能则可以设置为 true,当玩家点击切换账号按钮后,SDK 会触发1001回调,游戏可根据该回调 code 做相应处理useAgeRange游戏是否需要获取真实年龄段信息,默认为 true 。当为 true 时,使用 Tap 实名时会需要用户主动授权,当设置为 false 时,使用 Tap 实名时会进行无 UI 交互的静默授权
回调设置
为了处理用户在进行合规认证时触发的不同事件,游戏需通过设置回调进�行监听。示例如下:
- Unity
- Android Java
- Android Kotlin
- iOS Swift
- iOS Objective-C
using TapSDK.Compliance;

private Action<int, string> callback => (code, s) => {
    // do something
};

TapTapCompliance.RegisterComplianceCallback(callback);
import com.taptap.sdk.compliance.TapTapCompliance;
import com.taptap.sdk.compliance.TapTapComplianceCallback;
import com.taptap.sdk.compliance.constants.ComplianceMessage;

TapTapCompliance.registerComplianceCallback(new TapTapComplianceCallback() {
    @Override
    public void onComplianceResult(int code, @Nullable Map<String, ?> extra) {
        // 合规结果
        switch (code) {
            case ComplianceMessage.LOGIN_SUCCESS:
                // do something
                break;
            case ComplianceMessage.EXITED:
                // do something
                break;
            case ComplianceMessage.SWITCH_ACCOUNT:
                // do something
                break;
            case ComplianceMessage.PERIOD_RESTRICT:
                // do something
                break;
            case ComplianceMessage.DURATION_LIMIT:
                // do something
                break;
            case ComplianceMessage.INVALID_CLIENT_OR_NETWORK_ERROR:
                // do something
                break;
            default:
                break;
        }
    }
});
import com.taptap.sdk.compliance.TapTapCompliance
import com.taptap.sdk.compliance.TapTapComplianceCallback
import com.taptap.sdk.compliance.constants.ComplianceMessage

TapTapCompliance.registerComplianceCallback(
    callback = object : TapTapComplianceCallback {

        override fun onComplianceResult(code: Int, extra: Map<String, Any>?) {
            when (code) {
                ComplianceMessage.LOGIN_SUCCESS -> {
                    // 登录成功
                }

                ComplianceMessage.EXITED -> {
                    // 退出登录
                }

                ComplianceMessage.SWITCH_ACCOUNT -> {
                    // 切换账号
                }
            }
        }
    }
)
import TapTapComplianceSDK

// 实现 TapTapComplianceDelegate 协议
extension GameMainController: TapTapComplianceDelegate {
    func complianceCallback(with code: TapComplianceResultHandlerCode, extra: String?) {
        print("TapCompliance result code = \(code.rawValue)")
    }
}
// 注册合规认证回调
TapTapCompliance.register(self)
#import <TapTapComplianceSDK/TapTapCompliance.h>

@interface GameMainController() <TapTapComplianceDelegate>
@end

@implementation GameMainController

- (void)complianceCallbackWithCode:(TapComplianceResultHandlerCode)code extra:(NSString * _Nullable)extra {
    // 登录成功
    if (code == TapComplianceResultHandlerLoginSuccess) {
        // ....
    }
}

// 注册合规认证回调
- (void) registerCallback {
    [TapTapCompliance registerComplianceDelegate:self];
}
回调参数中 code 用于标识回调类型, extra 为对应提示信息
| 回调 code | 回调类型 | 触发逻辑 |
|---|---|---|
| 500 | LOGIN_SUCCESS | 玩家未受到限制,正常进入游戏 |
| 1000 | EXITED | 退出防沉迷认证及检查,当开发者调用 Exit 接口时或用户认证信息无效时触发,游戏应返回到登录页 |
| 1001 | SWITCH_ACCOUNT | 用户点击切换账号,游戏应返回到登录页 |
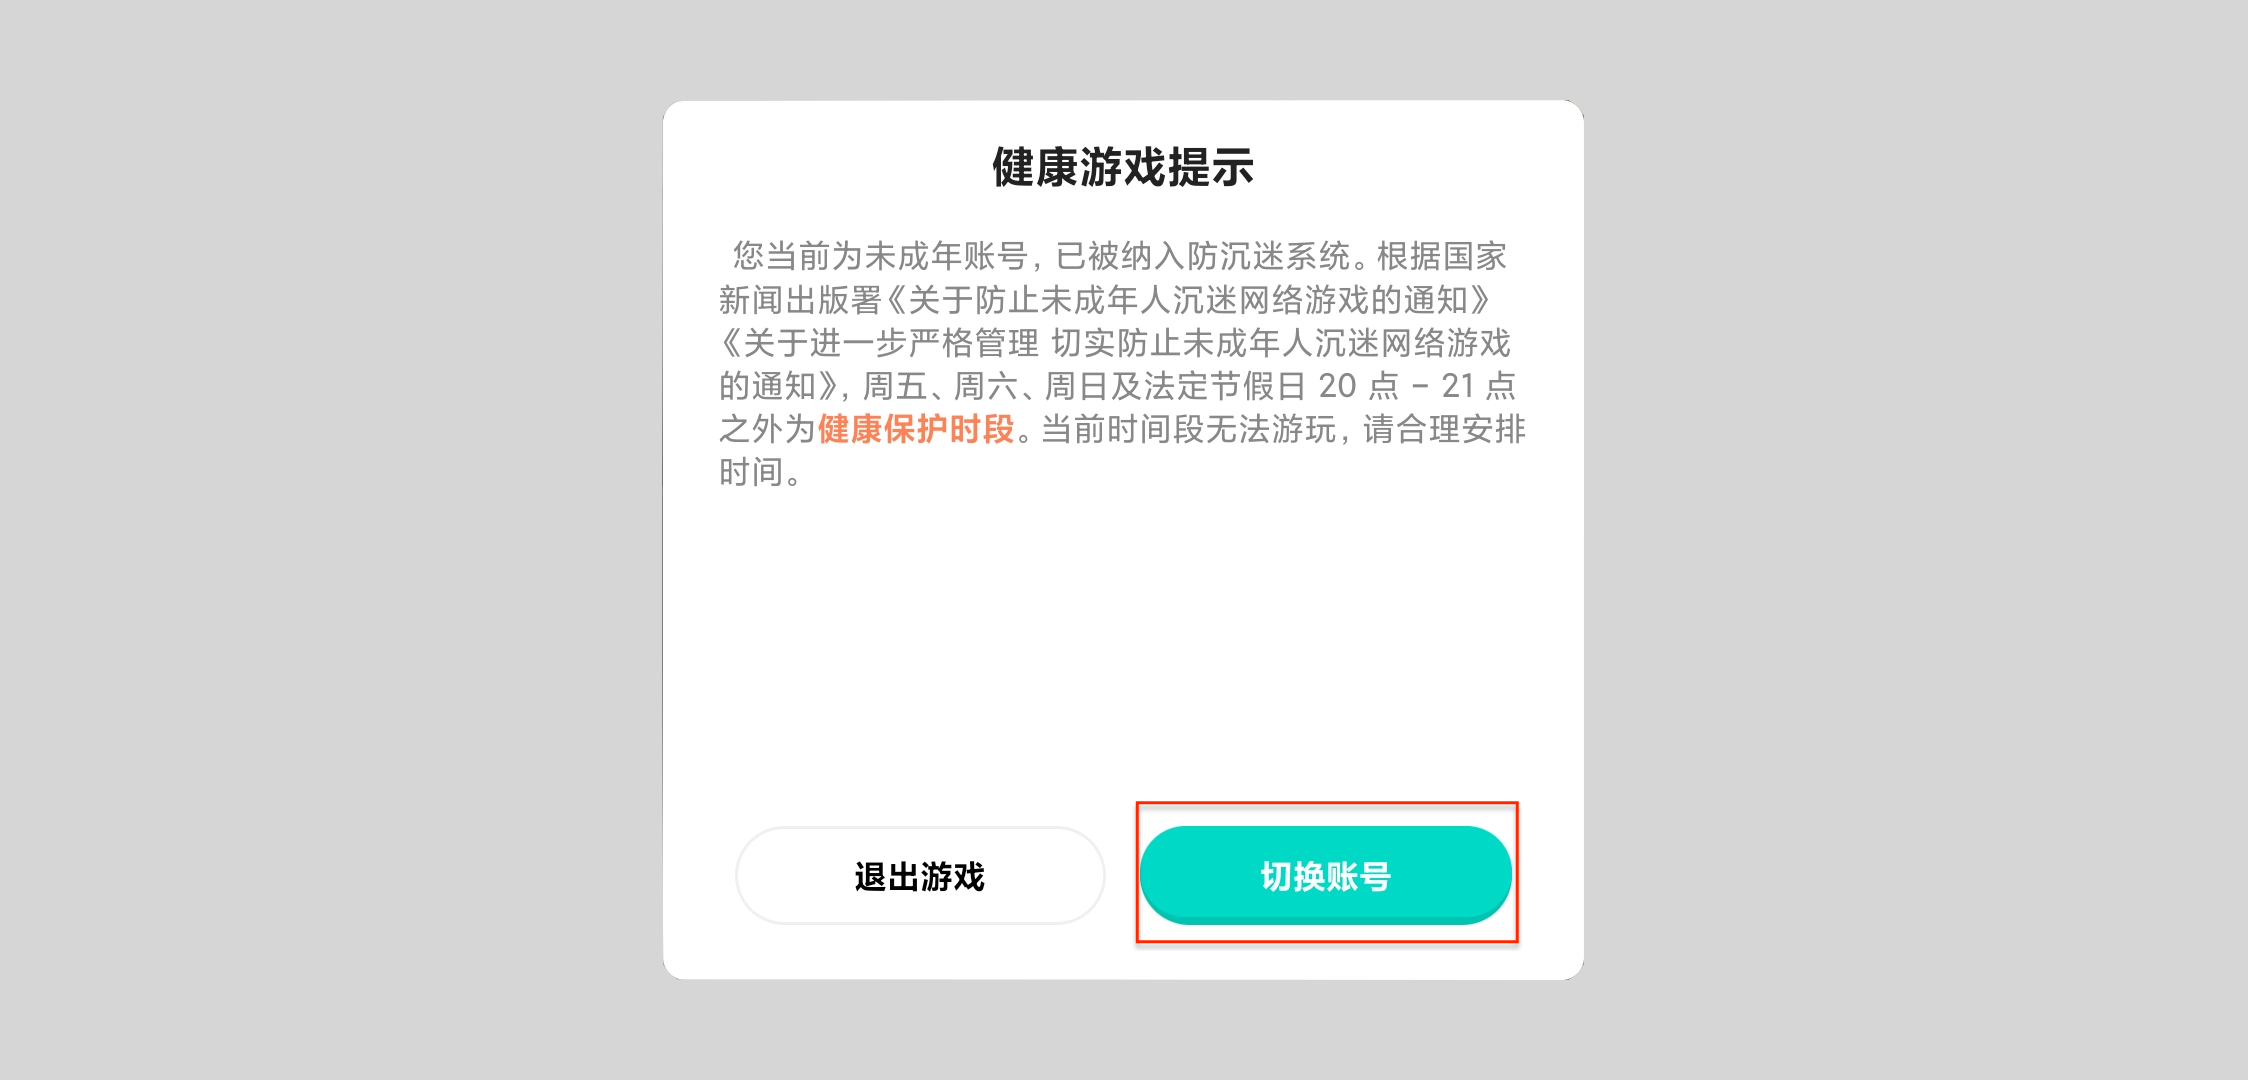
| 1030 | PERIOD_RESTRICT | 用户当前时间无法进行游戏,此时用户只能退出游戏或切换账号 |
| 1050 | DURATION_LIMIT | 用户无可玩时长,此时用户只能退出游戏或切换账号 |
| 1100 | AGE_LIMIT | 当前用户因触发应用设置的年龄限制无法进入游戏,该回调的优先级高于 1030,触发该回调无弹窗提示 |
| 1200 | INVALID_CLIENT_OR_NETWORK_ERROR | 数据请求失败,游戏需检查当前设置的应用信息是否正确及判断当前网络连接是否正常 |
| 9002 | REAL_NAME_STOP | 实名过程中点击了关闭实名窗,游戏可重新开始防沉迷认证 |
开始认证
防沉迷开始认证时需传入玩家唯一标识 userIdentifier,建议使用TapTap 用户认证
中的 openId。
玩家唯一标识 userIdentifier 作为账号的唯一字符串,字符串长度不大于 160,只能包含数字、大小写字母、下划线(_)、短横(-)、加号(+)、正斜线(/)、等号(=)、英文句号(.)、英文逗号(,)、英文冒号(:)。
- Unity
- Android Java
- Android Kotlin
- iOS Swift
- iOS Objective-C
using TapSDK.Compliance;

TapTapAccount account = await TapTapLogin.Instance.GetCurrentTapAccount();
if (account != null) {
    string userIdentifier = account.openId;
    TapTapCompliance.Startup(userIdentifier);
}
import com.taptap.sdk.compliance.TapTapCompliance;
import com.taptap.sdk.login.TapTapAccount;
import com.taptap.sdk.login.TapTapLogin;

TapTapAccount currentTapAccount = TapTapLogin.getCurrentTapAccount();
if(currentTapAccount != null) {
    String openId = currentTapAccount.getOpenId();
    TapTapCompliance.startup(activity, openId);
}
import com.taptap.sdk.compliance.TapTapCompliance

TapTapCompliance.startup(activity = this, userId = "userIdentifier")
import TapTapComplianceSDK
import TapTapLoginSDK

let userIdentifier = TapTapLogin.currentAccount?.userInfo?.openId
TapTapCompliance.startup(userIdentifier)
#import <TapTapComplianceSDK/TapTapCompliance.h>
#import <TapTapLoginSDK/TapTapLoginSDK-Swift.h>

NSString * userIdentifier = nil;
if (TapTapLogin.getCurrentTapAccount != nil){
    UserInfo * userInfo = TapTapLogin.getCurrentTapAccount.userInfo;
    if (userInfo != nil) {
        userIdentifier = userInfo.openId;
        [TapTapCompliance startup:userIdentifier];
    }
}
充值额度限制
不同年龄段的玩家,充值金额有不同的上限,开发者需在玩家充值前检查是否受限,并在玩家成功充值后上报充值金额,具体流程如下:
检查充值限制
游戏在收到玩家的充值请求后,调用以下接口检查本次充值行为是否受限:
- Unity
- Android Java
- Android Kotlin
- iOS Swift
- iOS Objective-C
using TapSDK.Compliance;

// 充值金额,单位为分
var amount = 1000;

TapTapCompliance.CheckPaymentLimit(
   amount: amount,
   handleCheckPayLimit: checkResult =>
    {
        // 充值 status 结果: {checkResult.status}
        // status 为 1 时可以继续支付流程,为 0 时 SDK 会弹出对应提示窗口,开发者不需要额外处理
    },
    handleCheckPayLimitException: errorMsg =>
    {
        // 检查充值异常, 处理异常
    }
);
import com.taptap.sdk.compliance.TapTapCompliance;
import com.taptap.sdk.compliance.bean.CheckPaymentResult;
import com.taptap.sdk.kit.internal.callback.TapTapCallback;
import com.taptap.sdk.kit.internal.exception.TapTapException;

// 充值金额,单位为分
int amount = 100;

TapTapCompliance.checkPaymentLimit(activity, amount, new TapTapCallback<CheckPaymentResult>() {

    @Override
    public void onSuccess(CheckPaymentResult checkPaymentResult) {
        if(checkPaymentResult.getStatus()) {
            // 充值没有限制
        } else {
            // 在充值被限制时,SDK 会弹出对应提示窗口,开发者不需要额外处理
        }
    }

    @Override
    public void onFail(@NonNull TapTapException exception) {
        // 查询失败,开发者可以继续重试,但建议最多重试三次
    }

    @Override
    public void onCancel() {
    }
});
import com.taptap.sdk.compliance.TapTapCompliance
import com.taptap.sdk.kit.internal.callback.TapTapCallback

TapTapCompliance.checkPaymentLimit(
    activity = this,
    amount = amount,
    callback = object : TapTapCallback<CheckPaymentResult> {

        override fun onSuccess(result: CheckPaymentResult) {
            if (result.status) {
                // 充值没有限制
            }
            // 在充值被限制时,SDK 会弹出对应提示窗口,开发者不需要额外处理
        }

        override fun onFail(exception: TapTapException) {
            // 查询失败,开发者可以继续重试,但建议最多重试 3次
        }
    }
)
import TapTapComplianceSDK

// 充值金额,单位为分
let amount = 100
TapTapCompliance.checkPaymentLimit(amount) { status, title, desc in
    // 充值没有限制
    if status {
        // TODO: 完成后续充值流程
    }
    // 在充值被限制时,SDK 会弹出对应提示窗口,开发者不需要额外处理
} failureHandler: { msg in
    // 查询失败,开发者可以继续重试,但建议最多重试三次
}
#import <TapTapComplianceSDK/TapTapCompliance.h>

// 充值金额,单位为分
NSInteger amount = 100;

[TapTapCompliance checkPaymentLimit:amount callBack:^(BOOL status, NSString * _Nonnull title, NSString * _Nonnull description) {
    if (status) {
        // 充值没有限制
        // TODO: 完成后续充值流程
    }
    // 在充值被限制时,SDK 会弹出对应提示窗口,开发者不需要额外处理
} failureHandler:^(NSString * _Nonnull errorMsg) {
    // 查询失败,开发者可以继续重试,但建议最多重试三次
}];
充值金额的单位为分。
上报充值金额
当玩家充值成功后,开发者需调用如下接口上报玩家充值金额:
- Unity
- Android Java
- Android Kotlin
- iOS Swift
- iOS Objective-C
using TapSDK.Compliance;

// 充值金额,单位为分
long amount = 100;
TapTapCompliance.SubmitPayment(
    amount: amount,
    handleSubmitPayResult: () =>
    {
        // 成功
    },
    handleSubmitPayResultException: (exception) =>
    {
        // 处理异常
    }
);
import com.taptap.sdk.compliance.TapTapCompliance;
import com.taptap.sdk.kit.internal.callback.TapTapCallback;
import com.taptap.sdk.kit.internal.exception.TapTapException;

int amount = 100;
TapTapCompliance.submitPayment(amount, new TapTapCallback<JsonElement>() {
    @Override
    public void onSuccess(JsonElement jsonElement) {
        // 上报充值成功
    }

    @Override
    public void onFail(@NonNull TapTapException exception) {
        // 上报充值失败
    }

    @Override
    public void onCancel() {
    }
});
import com.taptap.sdk.compliance.TapTapCompliance
import com.taptap.sdk.kit.internal.callback.TapTapCallback

TapTapCompliance.submitPayment(
    amount = amount,
    callback = object : TapTapCallback<JsonElement> {
        override fun onSuccess(result: JsonElement) {
            // 上报充值成功
        }

        override fun onFail(exception: TapTapException) {
            // 上报充值失败
        }
    }
)
import TapTapComplianceSDK

// 充值金额,单位为分
let amount = 100
TapTapCompliance.submitPayment(amount) { success in
   // 上报成功
} failureHandler: { msg in
   // 上报失败,开发者可以继续重试,但建议最多重试三次
}
#import <TapTapComplianceSDK/TapTapCompliance.h>

// 充值金额,单位为分
NSInteger amount = 100;

[TapTapCompliance submitPayment:amount callBack:^(BOOL success) {
    // 上报成功
} failureHandler:^(NSString * _Nonnull error) {
    // 上报失败,开发者可以继续重试,但建议最多重试三次
}];
上报充值金额时,传入的充值金额的单位同样为分。
退出认证�
玩家在游戏内退出账号时调用,重置防沉迷状态。
- Unity
- Android Java
- Android Kotlin
- iOS Swift
- iOS Objective-C
using TapSDK.Compliance;

TapTapCompliance.Exit();
import com.taptap.sdk.compliance.TapTapCompliance;

TapTapCompliance.exit();
import com.taptap.sdk.compliance.TapTapCompliance

TapTapCompliance.exit()
import TapTapComplianceSDK

TapTapCompliance.exit()
#import <TapTapComplianceSDK/TapTapCompliance.h>

[TapTapCompliance exit];
其他
获取玩家年龄段
开发者可调用如下接口获取玩家所处年龄段:
- Unity
- Android Java
- Android Kotlin
- iOS Swift
- iOS Objective-C
using TapSDK.Compliance;

int ageRange = await TapTapCompliance.GetAgeRange();
import com.taptap.sdk.compliance.TapTapCompliance;

int ageRange = TapTapCompliance.getAgeRange();
import com.taptap.sdk.compliance.TapTapCompliance

TapTapCompliance.getAgeRange()
import TapTapComplianceSDK

let ageRange = TapTapCompliance.getAgeRange().rawValue
#import <TapTapComplianceSDK/TapTapCompliance.h>

NSInteger ageRange = TapTapCompliance.getAgeRange;
上例中的 ageRange 是一个整数,表示玩家所处年龄段的下限(最低年龄)。
| 类型数值 | 含义 |
|---|---|
| -1 | 未知 |
| 0 | 0 到 7 岁 |
| 8 | 8 到 15 岁 |
| 16 | 16 到 17 岁 |
| 18 | 成年玩家 |
-1 表示「未知」,说明该用户还未实名或未授予年龄段权限,通常有以下几个原因:
- 开发者在用户未完成实名时调用该接口,应该在收到用户是否可进入游戏的回调时(回调 code 为 500 / 1030 / 1050)时,再进行调用
- 在防沉迷初始化时配置的参数 useAgeRange 设置为 false 导致,需设置为 true
- 该游戏无版号且在 TapPlay 中运行
- 用户首次进入游戏时游戏未开启获取年龄段权限,则该用户后续获取年龄段返回的都是 -1。
获取剩余时长
获取玩家当前剩余时长:
- Unity
- Android Java
- Android Kotlin
- iOS Swift
- iOS Objective-C
using TapSDK.Compliance;

int time = await TapTapCompliance.GetRemainingTime(); // 单位:秒
import com.taptap.sdk.compliance.TapTapCompliance;

int remainingTime = TapTapCompliance.getRemainingTime(); // 单位:秒
import com.taptap.sdk.compliance.TapTapCompliance

TapTapCompliance.getRemainingTime()
import TapTapComplianceSDK

let remainingTimeInSeconds = TapTapCompliance.getRemainingTime()    // 单位:秒
#import <TapTapComplianceSDK/TapTapCompliance.h>

NSInteger remainTime = TapTapCompliance.getRemainingTime;
设置适龄限制
当除了需要满足防沉迷政策外,应用需要对用户年龄有额外限制时,例如只允许 16 周岁以上使用,开发者可在 开发者中心页面配置对应的年龄限制,SDK 将在用户完成实名后
且 根据时长限制规则显示 UI 前检查用户是否符合游戏要求,满足要求时,SDK 会继续进行后续时长业务及回调处理,否则会直接返回 code 为 1100 的年龄限制回调通知开发者。