Getting Started with Multiplayer - JavaScript
Welcome to Multiplayer. This tutorial will explain the core usage of the SDK by simulating a scenario that compares players' scores.
Installation
The Multiplayer Client SDK is open source. You can download Release version directly. For source code, please visit Play-SDK-JS.
Supported Development Platforms
WeChat Developer Tools: WeChat Mini Programs / WeChat Mini Games
CocosCreator: Mac, Web, WeChat Mini Games, Facebook Instant Games, iOS, Android.
LayaAir: WeChat Small Game
Egret:Web
Cocos Creator
Download play.js and drag and drop it into your Cocos Creator project, select "Plugin" mode to import. See Cocos Creator plugin script.
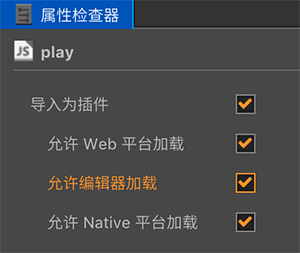
Select the play.js file you just imported in Cocos Creator, and check all the following options in the Property Inspector:
- Import as plugin
- Allow web platform loading
- Allow editor loading
- Allow Native platform loading
As shown in the figure:
LayaAir
Download play-laya.js to the bin/libs directory of your Laya project.
In bin/index.html, introduce the SDK file you just downloaded before the item "UI file generated by IDE":
  <!-- Provides various component implementations for making UI -->
    <script type="text/javascript" src="libs/laya.ui.js"></script>
  <!-- User-defined order file added here -->
  <!-- jsfile--Custom -->
+   <script src="libs/play-laya.js"></script>
  <!-- jsfile--Custom -->
  <!-- UI files generated by the IDE -->
  <script src="../src/ui/layaUI.max.all.js"></script>
Egret
Download play-egret.zip and extract it to the libs directory of your Egret project.
Add the SDK configuration to the egretProperties.json file in the Egret project:
{
  "engineVersion": "5.2.13",
  "compilerVersion": "5.2.13",
  "template": {},
  "target": {
    "current": "web"
  },
  "modules": [
    {
      "name": "egret"
    },
    ...
+    {
+      "name": "Play",
+      "path": "./libs/play"
+    }
  ]
}
Under the Egret project, execute the Egret build -e command, and if a reference to the SDK is generated in manifest.json, the SDK has been installed successfully.
{
  "initial": [
    "libs/modules/egret/egret.js",
    ...
+    "libs/play/Play.js"
  ],
  "game": [
    ...
  ]
}
You can refer to Egret third-party library usage.
WeChat Mini Program
Download play-weapp.js and drag and drop it to the project directory of WeChat Mini Program.
Node.js installation
Install and reference the SDK:
npm install @leancloud/play --save
Logging
Logging can be used to track down problems. The SDK supports debugging with logging turned on in both browser and Node.js environments. When debugging logging is enabled, the SDK will output network requests, error messages, and other information to the console.
Browser
In browser environment, please open the console of your browser and run the following command:
localStorage.debug = 'Play'
Node.js
In a Node.js environment, you need to set the environment variable DEBUG to Play, which you can set before starting a command.
Here's an example of a command to start Cloud Engine debugging locally, lean up:
# Unix
DEBUG='Play' lean up
# Windows cmd
set DEBUG=Play lean up
Initialisation
Importing the SDK
const {
  Client,
  Region,
  Event,
  ReceiverGroup,
  setAdapters,
  LogLevel,
  setLogger,
} = Play;
const client = new Client({
  appId: 'your-client-id',                // Client ID of the game
  appKey: 'your-client-token',            // Client Token for the game
  playServer: 'https://your_server_url',  // The game's API domain name
  userId: 'tarara',                       // Set the user id
  gameVersion: '0.0.1' // Set the game version number, optional, default 0.0.1, players of different versions will not be matched in the same room.
});
- The
Client IDandClient Tokenof the game can be viewed at Developer Centre > Your Games > Game Services > Application Configuration. - The API domain name is viewable at Application Configuration > Domain Configuration > API. Refer to the documentation for domain name for more information.
Connecting to a Multiplayer server
client
  .connect()
  .then(() => {
    // Connection successful
  })
  .catch((error) => {
    // connection failure
    console.error(error.code, error.detail);
  });
Creating or Joining a Room
By default the Play SDK does not require a "lobby" to create/join a room.
// For example, if 4 players join a room with the name "room1" at the same time, and if it doesn't exist, then create and join the
client
  .joinOrCreateRoom("room1")
  .then(() => {
    // Join or create a room successfully
  })
  .catch((error) => {
    // Failed to join a room and did not successfully create a room
    console.error(error.code, error.detail);
  });
joinOrCreateRoom ensures that two client players can enter the same room by having the same roomName. Please refer to the Developer Guide for more information on the usage of joinOrCreateRoom.
Synchronising Player Properties via CustomPlayerProperties
When a new player joins the room, the Master assigns a score to each player, which is synchronised to the players via "Player Custom Properties". (No more complex algorithms are done here, just 10 points are assigned to the Master and 5 points to the other players).
// Register new players to join the room event
client.on(Event.PLAYER_ROOM_JOINED, (data) => {
  const { newPlayer } = data;
  console.log(`new player: ${newPlayer.userId}`);
  if (client.player.isMaster) {
    // Get a list of players in the room
    const playerList = client.room.playerList;
    for (let i = 0; i < playerList.length; i++) {
      const player = playerList[i];
      // Set 10 points if the judgement is a homeowner, otherwise set 5 points
      if (player.isMaster) {
        player.setCustomProperties({
          point: 10,
        });
      } else {
        player.setCustomProperties({
          point: 5,
        });
      }
    }
    // ...
  }
});
Players get scores and display their scores.
// Register for "Player Attribute Change" event
client.on(Event.PLAYER_CUSTOM_PROPERTIES_CHANGED, (data) => {
  const { player } = data;
  // Deconstruct to get the player's score
  const { point } = player.customProperties;
  console.log(`${player.userId}: ${point}`);
  if (player.isLocal) {
    // Determine if the player is themselves and do the UI display
    this.scoreLabel.string = `score:${point}`;
  }
});
Communication via Custom Events
When the score is distributed, the ID of the winner (Master) is sent as an argument to all players via a custom event.
if (client.player.isMaster) {
  const WIN_EVENT_ID = 2;
  client.sendEvent(
    WIN_EVENT_ID,
    { winnerId: client.room.masterId },
    { receiverGroup: ReceiverGroup.All }
  );
}
Make different UI displays depending on whether you judge the winner to be yourself or not.
// Registering custom events
client.on(Event.CUSTOM_EVENT, (event) => {
  // Deconstructing event parameters
  const { eventId, eventData } = event;
  if (eventId === "win") {
    // Deconstruction gets the winners Id
    const { winnerId } = eventData;
    console.log(`winnerId: ${winnerId}`);
    // If the winner is yourself, display the victory UI; otherwise display the defeat UI
    if (client.player.actorId === winnerId) {
      this.resultLabel.string = "win";
    } else {
      this.resultLabel.string = "lose";
    }
    client.close().then(() => {
      // Disconnect successful.
    });
  }
});
Demo
We have completed this Demo in Cocos Creator, LayaAir, and Egret Wing for you to run and reference.
Build Notes
You can build the projects supported by Cocos Creator.
Only the Android project requires a little extra configuration when building it, which requires the following code to be added before initialising play:
onLoad() {
  const { setAdapters } = Play;
  if (cc.sys.platform === cc.sys.ANDROID) {
    const caPath = cc.url.raw('resources/cacert.pem');
    setAdapters({
      WebSocket: (url) => new WebSocket(url, 'protobuf.1', caPath)
    });
  }
}
The reason for this is that the SDK uses WebSocket-based wss for secure communication, and you need to adapt the CA certificate mechanism of Android platform through the above code.